|
|
|
Usuarios conectados
Actualmente hay 5791 visitantes online. |
|
Productos
|
|
Información
|
|
Destacado
|
|
|
 |
|
|
No hay comentarios de productos.
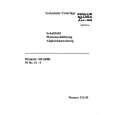
CB-V240U
1 2 5
Ring Baque Lens hole Trou pour objectif
SNOW & RAIN JACKET HOUSSE ANTI-PLUIE ET NEIGE
SNAPSHOT button Touche SNAPSHOT
Power Zoom Lever Commande de zoom
1
Lock Button Touche de verrouillage
MENU/BRIGHT Wheel Molette MENU/BRIGHT
34 8 6 7
Grip Strap Courroie poignée � � (Automatic) mode Mode � � (Automatique)
L
OF A Y F
2
Recording Start/Stop button Touche de marche/ arrêt d�enregistrement The BN-V428U extendeduse battery pack can be used. La batterie BN-V428U longue durée peut être utilisée.
INSTRUCTIONS
ENGLISH
MODE D�EMPLOI
FRAN�AIS
An exclusive, handy sized jacket to protect the Digital Video Camera from light rain and snow.
Cette housse pratique est prévue exclusivement pour protéger le camescope numérique contre la pluie et la neige.
PREPARATION BEFORE INSTALLING THE SNOW & RAIN JACKET ONTO THE DIGITAL VIDEO CAMERA
� Turn the power of the camera off. � Attach a battery pack. � Insert a video cassette and memory card*. (*Models with memory card only.) � Remove the lens cap and string from the Digital Video Camera and detach the lens cap string from the grip strap. NOTES: � Set the LIGHT OFF/AUTO/ON Switch to �OFF�. � Do not turn the video light on. (Only for Digital Video Cameras equipped with a video light ) The video light may heat up and deform the jacket, or set it on fire. � Set the Digital Video Camera�s power to �OFF�. � Please refer to the instruction manual of your Digital Video Camera for operating procedures. 1 Open the zipper.
PR�PARATIFS AVANT L�INSTALLATION DE LA HOUSSE ANTI-PLUIE ET NEIGE SUR LE CAMESCOPE NUM�RIQUE
� Coupez l�alimentation de la camescope. � Fixez une batterie. � Introduire une cassette vidéo et une carte mémoire*. (*Modèles avec carte mémoire uniquement.) � Retirer le capuchon d�objectif et détacher le cordon du capuchon d�objectif de la courroie poignée et le cordon du camescope. REMARQUES: � Régler le commutateur LIGHT OFF/AUTO/ON sur �OFF�. � Ne pas allumer la torche vidéo. (Uniquement pour des camescopes équipés d�une torche vidéo) La torche vidéo pourrait chauffer et déformer la housse, ou y mettre le feu. � Régler l�alimentation du camescope sur �OFF�. � Veuillez-vous référer au mode d�emploi de votre camescope pour les procédures de fonctionnement.
P
INSTALLATION
INSTALLATION
1 Ouvrez la fermeture éclair. 2 Glissez le camescope dans la housse en plaçant l�objectif du camescope dans le trou d�objectif de la housse. � La prise de vue est possible en regardant l�écran LCD si le camescope est placé dans la housse avec l�écran LCD dirigé vers l�extérieur. 3 Retirez la bande Velcro et passez la courroie poignée par le trou sur la housse pour la faire sortir. 4 Refermez la bande Velcro. 5 Nouez le cordon du capuchon d�objectif à la courroie poignée pour ne pas le perdre. � Le capuchon d�objectif ne peut pas être monté sur le camescope lorsque ce dernier est dans la housse. 6 Fixez la bague fournie à l'objectif. � Un filtre 43 mm peut également être attaché à la bague. 7 Passez le viseur par le trou tout en l�inclinant vers le haut. Puis, fermez la fermeture éclair. � Introduisez l�abattant entre le viseur et la batterie. 8 Ouvrez le bourrelet de la courroie poignée et insérez-y votre main ou votre gant.
2 Slide the Digital Video Camera into the jacket, placing the Digital Video Camera�s lens in the lens hole of the jacket. � Shooting may be performed while watching the LCD by placing the camera in the jacket with its LCD facing outward. 3 Remove the Velcro tape and thread the grip strap through the hole on the jacket to pull it out. 4 Fasten the Velcro tape again. 5 Tie the lens cap string to the grip strap so you do not lose it. � The lens cap cannot be attached to the camcorder when the jacket is on it. 6 Attach the provided ring to the lens. � A 43 mm filter can also be attached to the ring. 7 Pass the viewfinder through the hole while tilting it upward. Then, close the zipper. � Insert the flap between the viewfinder and the battery pack. 8 Open up the pad of the grip strap and adjust it to fit your hand or glove.
RECORDING
1 Set the power dial of the camera to � � You can also shoot with it set to � �. 2 Push the start/stop button. �.
ENREGISTREMENT
1 Réglez la molette d'alimentation du camescope sur � �. � Vous pouvez également filmer avec la molette réglée sur � �. 2 Appuyez sur la touche de marche/arrêt d�enregistrement. � Ouvrez le cache de la housse pour commander la commande de zoom, la touche SNAPSHOT et la molette MENU/BRIGHT.
� Open the cover on the jacket to operate the zoom lever, SNAPSHOT button and MENU/ BRIGHT Wheel.
OPERATING PRECAUTIONS
The Snow & Rain Jacket is not designed to be waterproof. Do not use it for long hours in snow or rain. Do not install or remove the jacket on or from the Digital Video Camera in grit, snow or rain. Should rain drops or snow flakes attach to the Digital Video Camera�s lens surface, wipe them off with a soft cloth. Otherwise the water drops or snow flakes may be brought into focus and the intended subject may thus be out of focus. Do not use or leave the Snow & Rain Jacket in a place where the temperature may rise abnormally, for example near a fire or heater or in a closed automobile. To prevent surface deterioration, do not wipe the snow & rain jacket with a volatile chemical such as benzine, thinner, alcohol or with a chemical cloth. Be sure to remove the Snow & Rain Jacket from the Digital Video Camera before storing it after use. Noise may enter during zoom operation. Do not turn the video light on. (Only for Digital Video Cameras equipped with a video light ) The video light may heat up and deform the jacket, or set it on fire.
Please note that JVC cannot assume liability for any damage or malfunction to your Digital Video Camera due to rain or grit.
PR�CAUTIONS POUR L�UTILISATION
La housse anti-pluie et neige n�est pas étanche à l�eau. Ne l�utilisez pas pendant de longues heures sous la pluie ou la neige. Ne montez et ne retirez pas la housse du camescope numérique à des endroits où des matières étrangères, la pluie ou la neige pourraient pénétrer. Si des gouttes de pluie ou flocons de neige touchent l�objectif du camescope numérique, essuyez-les avec un chiffon doux. Sinon ils pourraient être nets et le sujet prévu flou. N�utilisez pas et ne laissez pas la housse anti-pluie et neige à un endroit où la température peut augmenter anormalement, par exemple près d�un feu ou d�un radiateur ou bien dans une voiture fermée. Pour éviter toute détérioration de la surface, n�essuyez pas la housse avec un produit chimique volatil, de la benzine, un diluant, de l�alcool ou avec un chiffon imprégné de solution chimique. N�oubliez pas de retirer la housse anti-pluie et neige du camescope numérique avant de ranger le camescope numérique après l�emploi. Du bruit peut entrer pendant le fonctionnement du zoom. Ne pas allumer la torche vidéo. (Uniquement pour des camescopes équipés d�une torche vidéo) La torche vidéo pourrait chauffer et déformer la housse, ou y mettre le feu.
Notez que JVC ne peut assumer de responsabilité pour aucun dommage ou mauvais fonctionnement du camescope numérique dû à la pluie ou à des matières étrangères.
SPECIFICATIONS
Dimensions (W x H x D) Weight : 80 mm x 105 mm x 200 mm : 65 g
� Design and specifications are subject to change without notice.
SP�CIFICATIONS
Dimensions (L x H x P) Poids : 80 mm x 105 mm x 200 mm : 65 g
LYT0765-001A 1200FOV*UN*AP
� Conception et spécifications sont sujettes à modification sans préavis.
COPYRIGHT © 2000 VICTOR COMPANY OF JAPAN, LTD.
|
|
|
> |
|