Su carrito de compras está vacío
 
English Polski Spanish 
Buscar un manual
 

(p.Ej. AA-V20EG JVC, ZX-7 Sony)
PayPal 1000+ rating Secure, Encrypted Checkout.
 
Usuarios conectados
Actualmente hay 5986 visitantes online.
Productos
Información
Destacado
Inicio >> JVC >> TK-C553 Manual de Usuario
 
 0 artículo(s) en Su carrito 

JVC TK-C553
Manual de Usuario


¡Twitee acerca de este producto y obtenga $1.00 de crédito en la tienda para uso!
  • Descargable
  • Formato PDF
  • Manual completo
  • Idiomas: English
Precio: $4.99

Descripción del JVC TK-C553 Manual de Usuario

Manual del propietario completo en formato digital. El manual estará disponible para descarga como archivo PDF después de que lo compre.

El Manual del Propietario (a veces llamado Manual del Usuario o Guía del Usuario) contiene información sobre cómo utilizar su dispositivo. Después de colocar la orden le enviaremos las instrucciones de descarga a su dirección de e-mail.

The manual is available in languages: English

Not yet ready
You must purchase it first

Opiniones de los clientes
No hay comentarios de productos.

TEXT_PDF_SNIPPET
Ceiling Installation

1.
�75

1.
Ceiling mount bracket

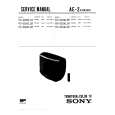
Make a hole (75 mm diameter) in the ceiling for passing the connection cables, and attach the provided ceiling mount to the ceiling. Coincide the center of the mount with the hole (75 mm diameter) for passing the cables through the ceiling. Attach the ceiling mount to the ceiling using 4 screws. Pass the wired terminal board through the hole in the center of the ceiling mount and leave if hanging down. � Use M4 screws or bolts for attaching the ceiling mount. � If wood screws are used, use screws with a diameter of 4.1 mm. � The screw head height should be no more than 4 mm. Attach the wired terminal board to the camera. 1) Slide the tab on the terminal board into the guide on the camera. When the terminal board is moved in the direction of the arrow, it is secured to the camera. 2) Connect the connector cable from the camera body to the connector on the terminal board.

Screws

Screws Tab

2.
Tab

2.
Guide Connector Connector cable Guide

3. 3.

Attach the drop prevention wire. As shown in the illustration, pull the drop prevention wire out from the ceiling mount and attach it to the drop prevention wire hook on the underside of the camera body. CAUTION

Drop prevention wire

Drop prevention wire hook

Be sure to attach the drop prevention wire. If not attached, the camera body could drop down.

17

Quizás también quiera comprar

$4.99

SX-K700 TECHNICS
Manual de Usuario

Manual del propietario completo en formato digital. El manual estará disponible para descarga como …

$4.99

CJ-V51 PIONEER
Manual de Servicio

Manual de servicio completo en formato digital (archivo PDF). Los manuales de servicio por lo genera…

$4.99

GRAND PRIX ELECTRONIC 754 BECKER
Manual de Servicio

Manual de servicio completo en formato digital (archivo PDF). Los manuales de servicio por lo genera…

$4.99

SX-PR602 TECHNICS
Manual de Servicio

Manual de servicio completo en formato digital (archivo PDF). Los manuales de servicio por lo genera…

$4.99

EV-S1000E SONY
Manual de Usuario

Manual del propietario completo en formato digital. El manual estará disponible para descarga como …

$4.99

GRAND PRIX ELECTRONIC 780 BECKER
Manual de Servicio

Manual de servicio completo en formato digital (archivo PDF). Los manuales de servicio por lo genera…

$4.99

AG7330 PANASONIC
Manual de Servicio

Manual de servicio completo en formato digital (archivo PDF). Los manuales de servicio por lo genera…

$4.99

EVO-9850 VOLUME 1 SONY
Manual de Servicio

Manual de servicio completo en formato digital (archivo PDF). Los manuales de servicio por lo genera…
>
Parse Time: 1.171 - Number of Queries: 127 - Query Time: 0.524