|
|
|
Usuarios conectados
Actualmente hay 5542 visitantes online. |
|
Productos
|
|
Información
|
|
Destacado
|
|
|
 |
|
|
No hay comentarios de productos.
English
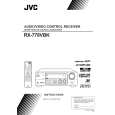
3. Press TEST to check the speaker output balance.
�TEST TONE L� starts flashing on the display, and a test tone comes out of the speakers in the following order:
TEST
4
On the front panel: You can also use the buttons on the front panel to adjust the Surround modes. However, no test tone is available when using the buttons on the front panel. So, make adjustments while listening to the sound of the source played back.
TEST TONE L
(Left front speaker)
TEST TONE C
(Center speaker)
TEST TONE R
(Right front speaker)
1. Press DSP MODE repeatedly until �THEATER� or �DIG THEATER� appears on the display.
DSP MODE
TEST TONE LS
(Left rear speaker)
TEST TONE RS
(Right rear speaker)
Notes:
� You can adjust the speaker output levels without outputting the test tone. � No test tone comes out of the center speaker when �CENTER SPK� is set to �NONE� (see page 14). � No test tone comes out of the rear speakers when �REAR SPK� is set to �NONE� (see page 14). � If the TV is turned on and the proper video input is selected on the TV, the test tone screen will appear on the TV. � The signal indicators also light on the display while the test tone comes out of the speaker. L: Lights when the test tone comes out of L C R the left front speaker. C: R: Lights when the test tone comes out of the center speaker.
LS RS
� When �THEATER� is selected, the PRO LOGIC, DSP, and THEATER indicators light up on the display. � When �DIG THEATER� is selected, the DSP and THEATER indicators light up on the display.
2. Adjust the speaker output levels.
1) Press BALANCE/SURROUND ADJUST repeatedly until one of the indications appears on the display. �CENTER LEVEL�: To adjust the center speaker level. �REAR L LEVEL�: To adjust the left rear speaker level. �REAR R LEVEL�: To adjust the right rear speaker level.
MULTI JOG
BALANCE/SURROUND ADJUST
Lights when the test tone comes out of the right front speaker. RS: Lights when the test tone comes out of the right rear speaker. LS: Lights when the test tone comes out of the left rear speaker.
CNTR
2) Turn MULTI JOG to adjust the selected speaker output level (from �10 dB to +10 dB). 3) Repeat 1) and 2) to adjust the other speaker output levels.
4. Adjust the speaker output levels.
2
� To adjust the center speaker level, press CNTR �/+ (from �10 dB to +10 dB). � To adjust the left rear speaker level, press REAR�L �/+ (from �10 dB to +10 dB). � To adjust the right rear speaker level, press REAR�R �/+ (from �10 dB to +10 dB).
3. Adjust the effect level.
3
1) Press BALANCE/SURROUND ADJUST repeatedly until �DSP EFFECT� appears on the display. The display changes to show the current setting. 2) Turn MULTI JOG to select the effect level. As you turn it, the effect level changes as follows:
BALANCE/SURROUND ADJUST
MENU
REAR�L
5
ENTER
6
MULTI JOG
REAR�R
8
9
DSP EFFECT 1
DSP EFFECT 2
DSP EFFECT 3
DSP EFFECT 5
DSP EFFECT 4
5. Press TEST again to stop the test tone.
TEST
As the number increases, JVC Theater Surround becomes stronger.
4
6. Press EFFECT to select an effect level you want.
� Each time you press the button, the effect level changes as follows:
EFFECT
7/P
DSP EFFECT 1
DSP EFFECT 2
DSP EFFECT 3
DSP EFFECT 5
DSP EFFECT 4
As the number increases, JVC Theater Surround becomes stronger.
26
|
|
|
> |
|